When it comes to DSLR cameras, there are primarily two types of buyers:-
One, who have just developed a passion for photography. They went on a trip to a serene place, took some magnificent photographs from their phone cameras, got 300+ likes on these photos on social media and are now willing to take up photography as a full time hobby.
Second, who went on one such trip few years ago and after getting those many likes on the photos, bought a DSLR and took up this hobby and have been following it religiously since then and are now more or a less a professional at photography OR the ones who have studied the course of photography in college OR the ones that have taken up a professional training of photography.
Having said that, I’d like you to kindly identify yourself in one of the above two categories, depending upon your experience in photography. This post shall cater to both the category of buyers, individually.

Buyers belonging to the first category are first time DSLR buyers and are thus at most risk of buying a camera which does not suit their subject of photography as there are different hardware requirements for catering to different styles of photography and a person who is new to this field would get puzzled just by the sheer number of terminologies among aperture size, exposure, megapixels, shutter speed, ISO etc that governs the functioning of a camera.
So today, we’ll take each of the terms and terminologies that you should be aware of while buying a DSLR camera, in detail and would then go on to decide which would be the best camera for you depending upon your need and preferred subject of photography.
Let’s Begin..
In photography, exposure is a critical element that determines what is actually recorded on a camera's image sensor. There are three adjustable elements that control the exposure - Aperture, ISO and Shutter Speed.
- Aperture

- ISO
You should always try to stick to the lowest ISO (base ISO) of your camera, which is typically ISO 100 or 200, whenever you can. If there is plenty of light, you are free to use a low ISO and minimize the appearance of noise as much as possible. Even in dim or dark environments, you still might be able to use a low ISO. For example, if you have your camera mounted on a tripod or sitting completely still on a table. In that case, you can safely use a low ISO and brighten your photo via a long shutter speed (discussed later in this post) instead, since you won’t introduce camera shake.

- Shutter Speed
Shutter speed is the length of time the shutter - a curtain in front of the camera sensor that stays closed until the camera fires. When the camera fires, the shutter opens and fully exposes the sensor to the light that passes through the lens. After the sensor is done collecting the light, the shutter closes immediately. The button that fires the camera is also called shutter button, as it triggers the shutter to open and close.The shutter speed is shown in seconds or fractions of a second: 1 s, 1/2 s, 1/4 s, 1/250 s, 1/500 s, etc. Essentially, it’s how long a camera spends taking a photo. When one uses a long shutter speed, one ends up exposing the sensor for a significant period of time, which has a couple important effects on the photo.
If you are photographing a subject that is in motion, you will get different effects at different shutter speeds. The faster the shutter speed the easier it is to photograph the subject without blur and “freeze” motion and the smaller the effects of camera shake. In contrast, slower shutter speeds are suited to suggesting the motion, such as that of flowing water or other moving subjects. Changing the shutter speed gives you control over whether to “freeze” or suggest motion.

Having learnt about the exposure and its elements, let’s proceed to learn the next very important term in the field of photography, the megapixels.
- Megapixels
The number of megapixels alone is no guarantee of heightened photographic performance. Instead, the formula for fantastic photos comes down to the entire camera module, which includes the size and material of the main camera lens, the light sensor, the image processing hardware, and the software that ties it all together.
Before deciding on the megapixel count, do answer this question:-
Would you be printing the photographs you click or would you keep it in the digital format for posting on social media and store it in your PC?If Yes, go for a higher megapixel count camera, typically above 24 megapixels. If No, you should be good with a 16 or a 12 MP one and thus you’d save some money as well.

THE SECOND CATEGORY
I am sure the buyers who belong to the second category are the ones who are pretty aware of the above mentioned terminologies, so considering your level of experience I’d like to add two more terminologies which you should know that would add volumes to your photography skills.
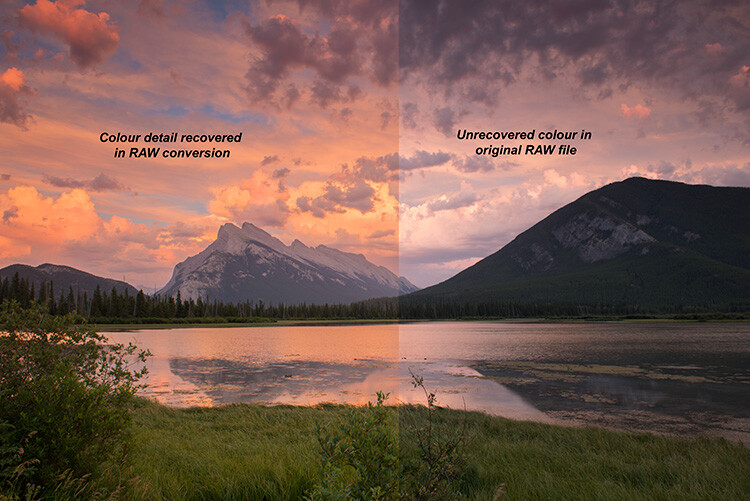
- RAW
Shooting in RAW will give you much more control over how your image looks and you will even be able to correct several errors you may have done when you took the photograph, such as the exposure.
To take advantage of this you will certainly need to use some software on your computer to process the files and produce JPEGs (or TIFFs). Most of the time the automatic settings are fairly decent, additionally you have the chance to change the white balance, exposure, contrast, saturation and even calibration of the red, green, and blue.
Softwares to use with RAW files for conversion are Picasa, Adobe Photoshop and RawShooter Premium
- Rule of Thirds

Now, having gained some knowledge about photography and its terminologies, let’s go on to decide which will be the best DSLR camera for you depending upon your need. We’ll zero down at some of the best products that are currently available in the market for each category of buyers.


